Live Sources: PC Screen, Camera and Capture Devices
Stream to 3D 5.5.0: Live-source creation is integrated into the main application. The separate Live Capture Source Creator executable is not required for the current workflow.
Live Sources are an additional input option for users who specifically want to convert a PC screen, camera or capture device. For ordinary use and a simpler first setup, select an existing 2D video file in Play, Stream or Convert and follow that workflow’s main guide.
What Live Sources do
A Live Source is a reusable .s3dsc file that describes a Windows video and audio source. You can select it instead of a normal video file, then use the available Play, Stream or Convert workflow to process PC screen content, a webcam, a video camera or a supported capture device as stereoscopic 3D.
Feature availability depends on your edition and licence. Current purchases include Live Sources; some earlier Standalone owners may need the Live Sources feature upgrade.
- Play converts the Live Source for immediate viewing on the PC. It is available in the Real-Time edition when Live Sources are enabled. Use this route when Virtual Desktop or Bigscreen is showing the converted Windows display in a headset.
- Stream sends the converted video over the network to a compatible media player. Network Stream is not included in the Real-Time edition. It is not the button for watching a browser or desktop through Virtual Desktop.
- Convert records the Live Source as a 3D video file for later viewing. Convert is not included in the Real-Time edition.
Quick start
- If you want to use a built-in laptop camera, turn it on first and confirm that it works in the Windows Camera app.
- In Stream to 3D, choose Play, Stream or Convert and open the source file browser.
- Select the Live Sources shortcut.
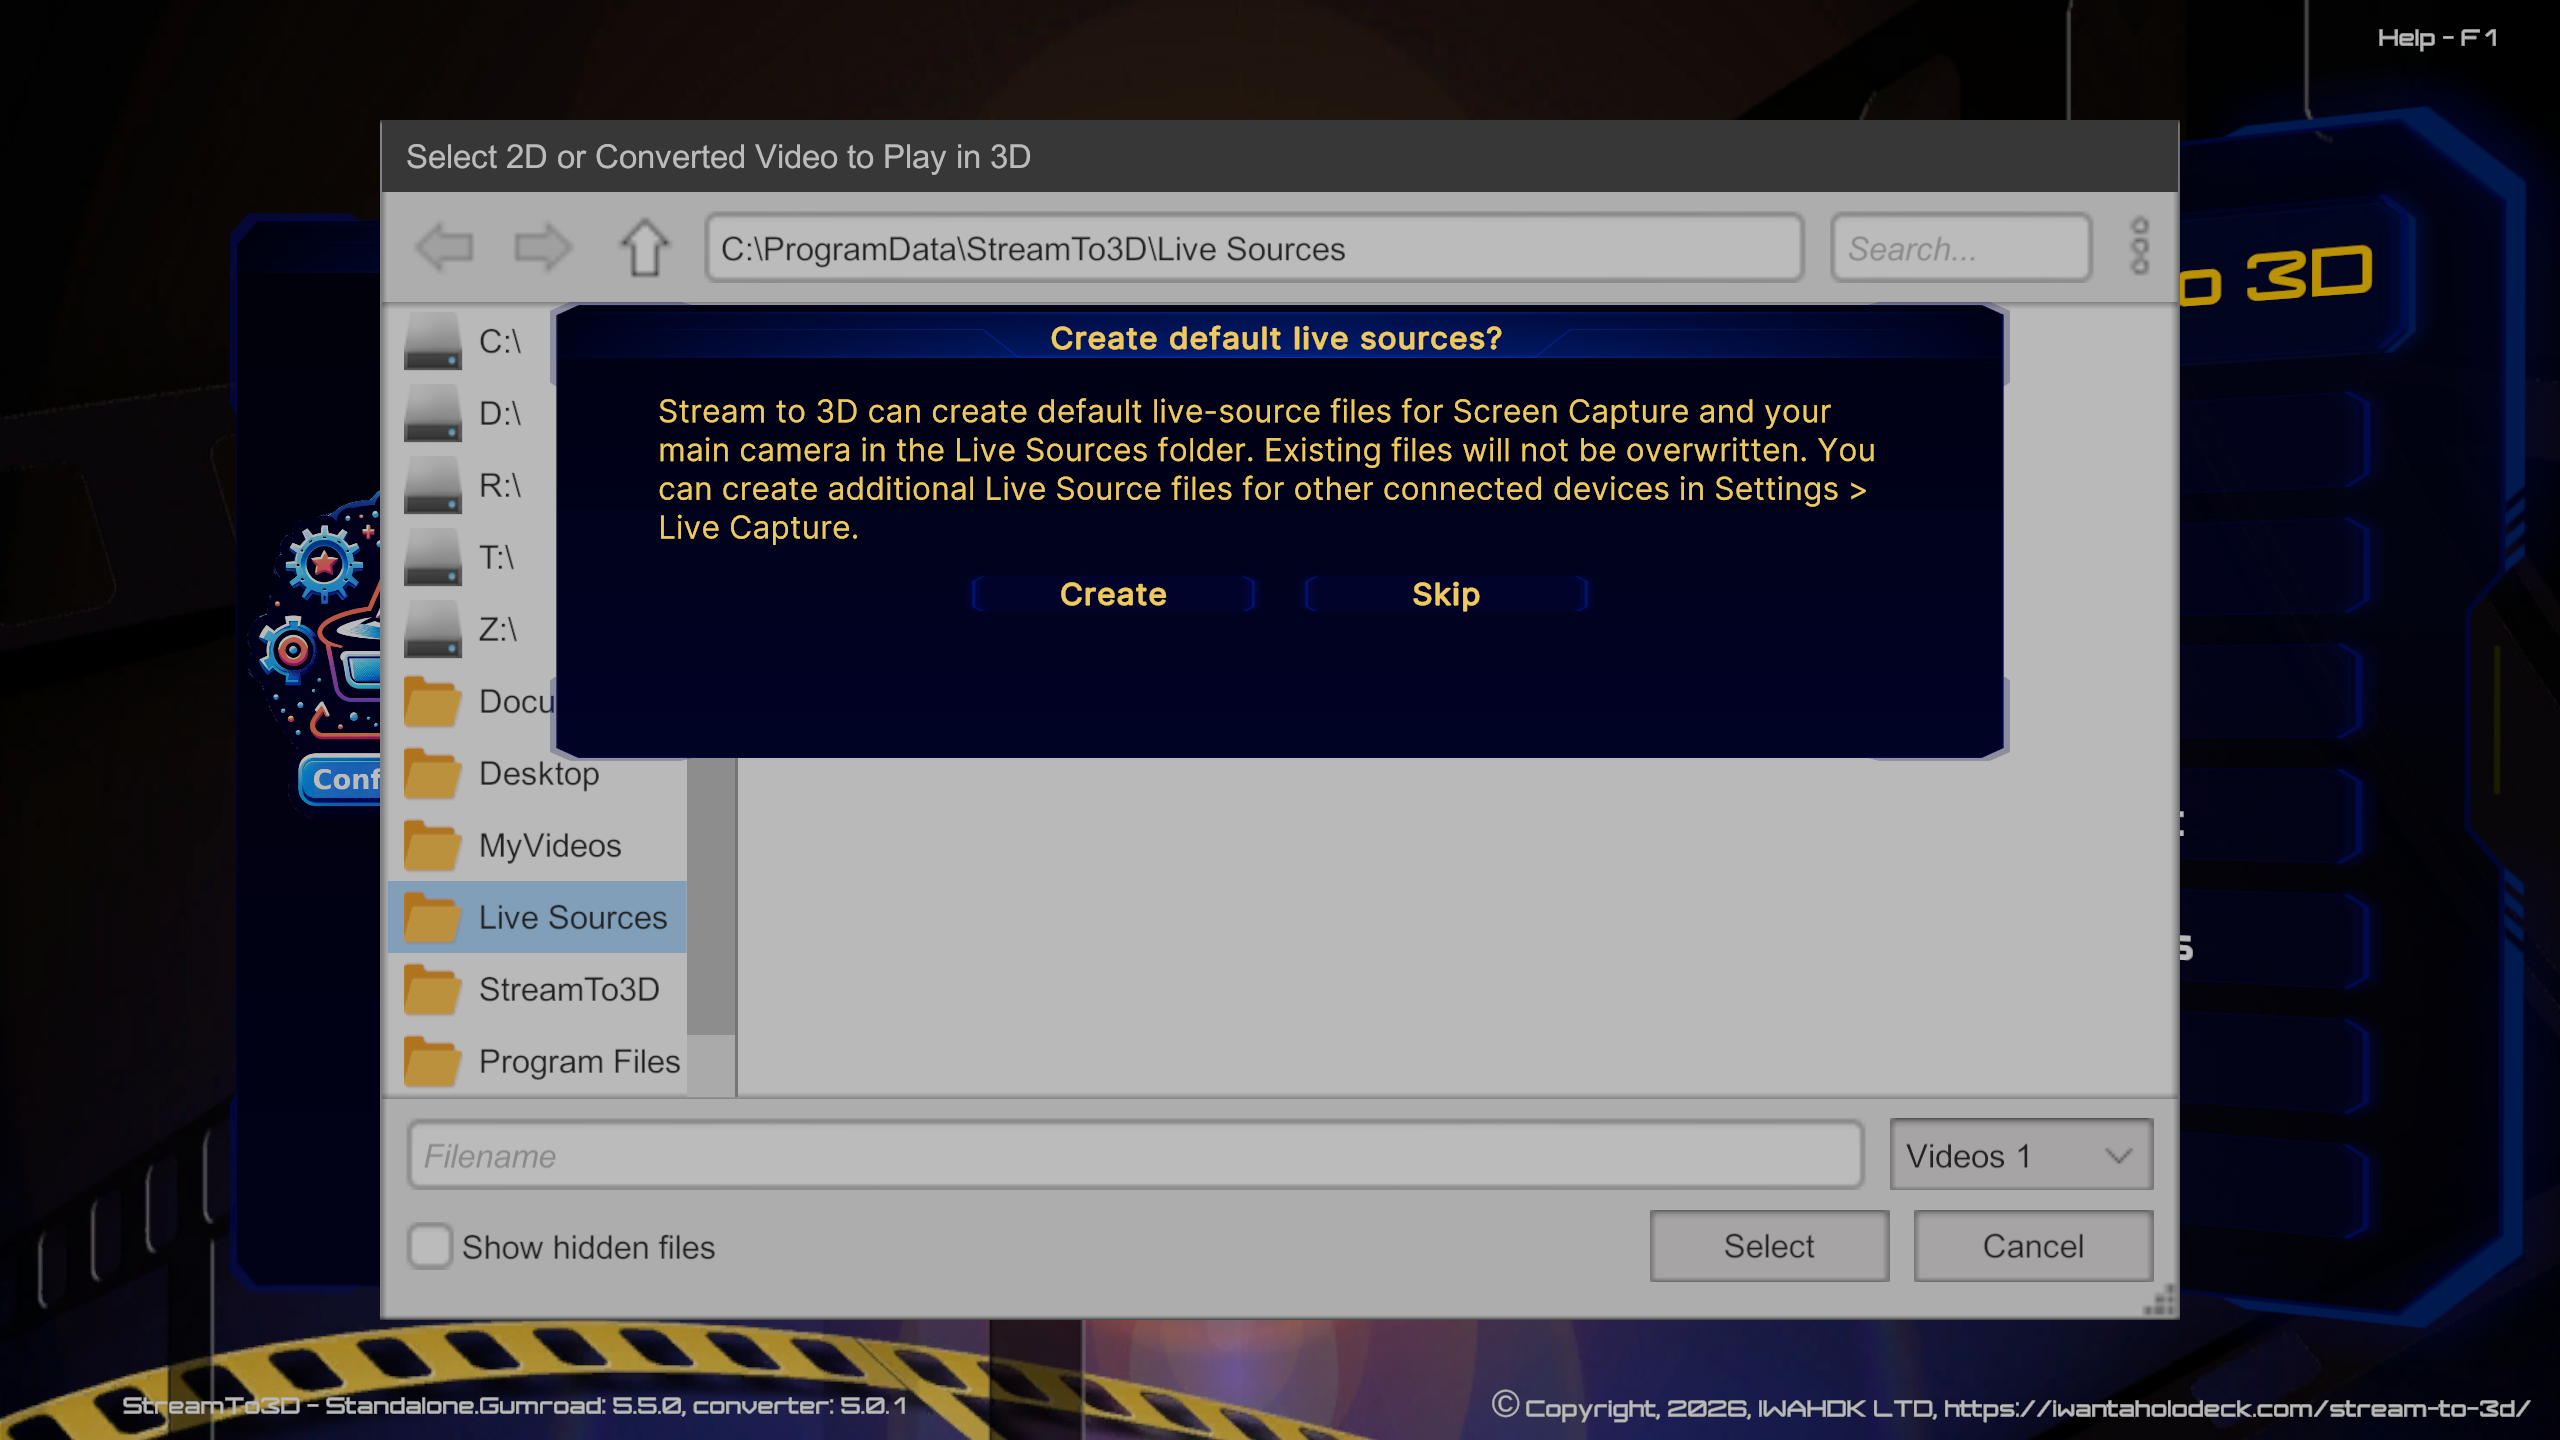
- If a default is missing, Stream to 3D asks whether it may create default Screen Capture and Main Camera sources. Choose Create to continue or Skip to manage sources manually.
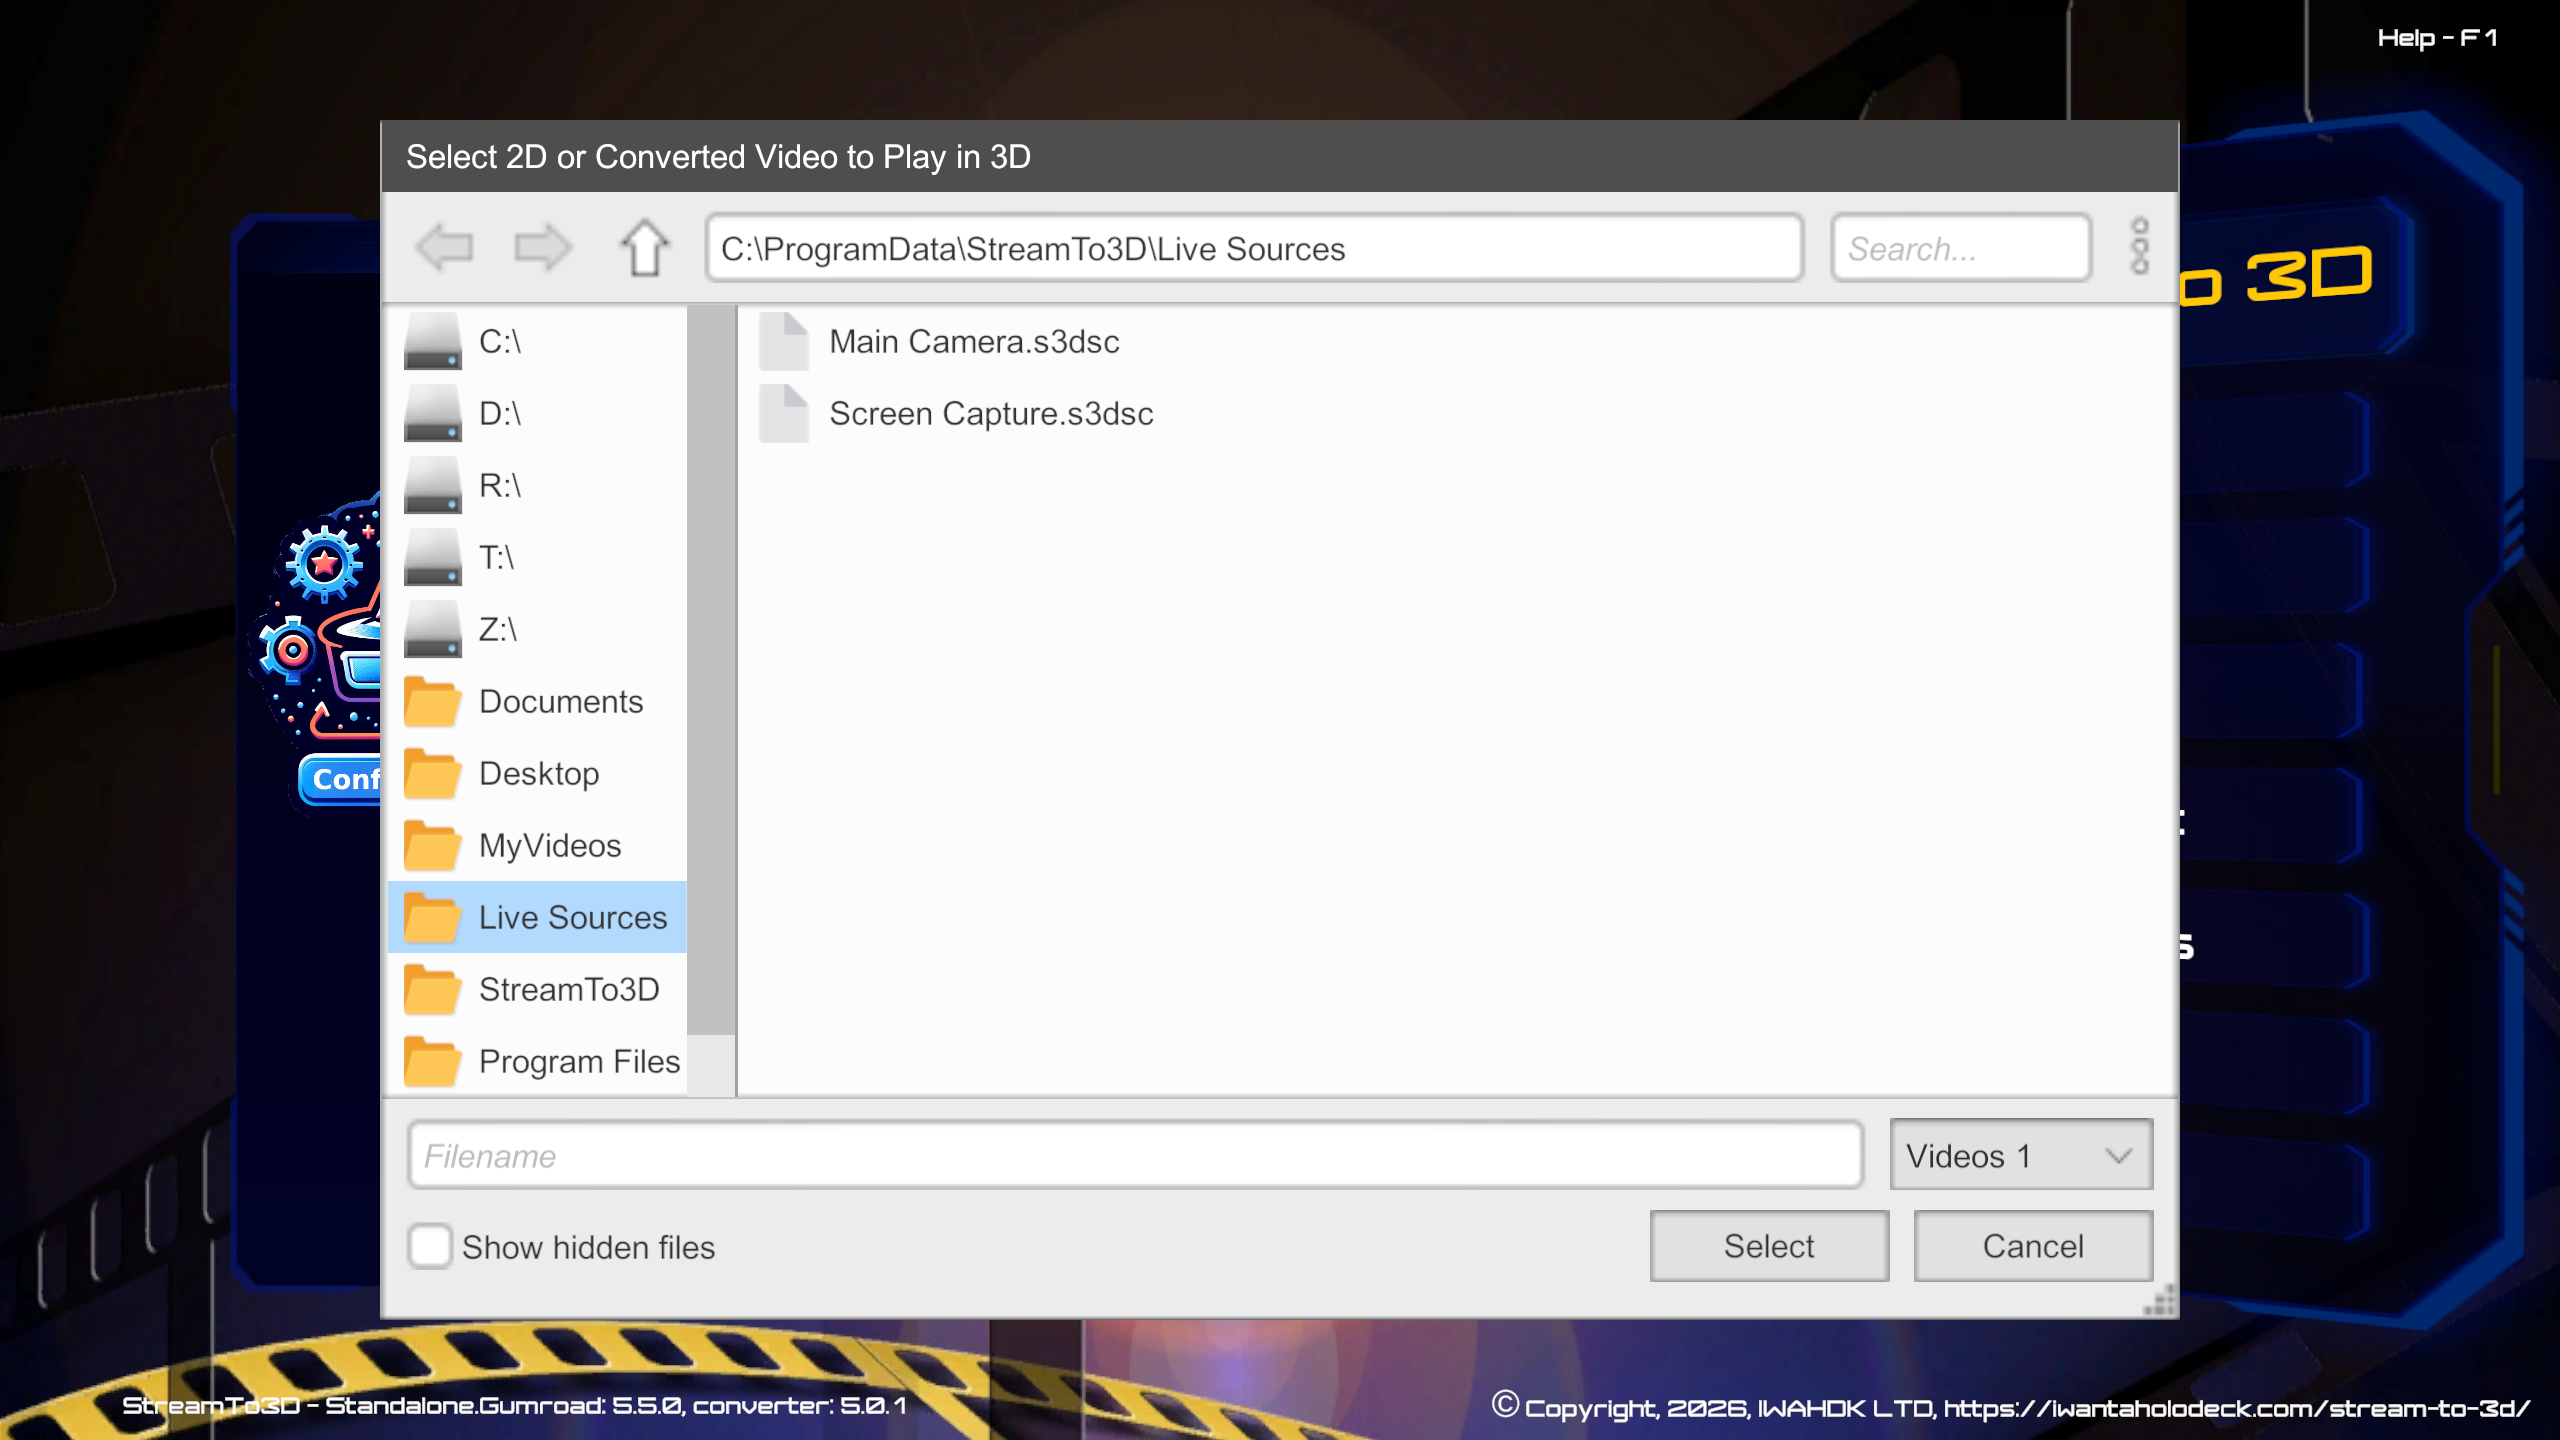
- Select
Screen Capture.s3dsc,Main Camera.s3dscor another live-source file. - Confirm the live capture duration, sample frame rate and audio delay, then continue through the normal workflow.
Creating the default live sources
Stream to 3D does not probe your camera during installation or application startup. When you select the Live Sources shortcut and a default file is missing, Stream to 3D asks whether to create it. Select Create to create the missing defaults or Skip to leave the files unchanged.
Screen Capture.s3dscuses the installed screen-capture support when it is available.Main Camera.s3dscuses the best matching built-in/main camera source that Stream to 3D can enumerate.- Existing files are never overwritten by automatic creation.
- No additional compatibility camera source is created automatically.
The files are stored in:
C:\ProgramData\StreamTo3D\Live Sources\If you choose Skip, nothing is created. Stream to 3D offers the prompt once per application session, so restart the application and select the Live Sources shortcut to be asked again.
Automatic creation requires an available audio input and prefers the system-audio capture source. If that source is not available, Stream to 3D can use the first usable audio input, which may be the built-in microphone. Open Live Sources and create a custom source if you need a different audio device or timing.
If default creation does not complete
- Neither source is created: enable a microphone or system-audio source, then select the Live Sources shortcut again.
- Main Camera is missing: turn the camera on, confirm it works in Windows Camera, close Windows Camera, then select the Live Sources shortcut again. Stream to 3D offers to create the missing Main Camera source without requiring a restart.
- Screen Capture is missing: use the Tools and Dependencies checks to repair the installed capture support.
- You selected Skip: create a source in Settings > Live Capture, or restart Stream to 3D to receive the default-source prompt again.
Create a custom Live Source
Open Settings > Live Capture when you need a different device, source format, sample rate, audio input or audio synchronisation setting. The integrated dialog is titled Live Capture: Live Sources.
- Click Refresh Devices after enabling or connecting the camera/capture device.
- Select the video source and format.
- Select the audio source.
- Review the reported native video frame rate and resolution.
- Set the 3D conversion sample frame rate and audio delay in milliseconds.
- Enter a clear source name and choose Create Live Source.
Use Open Live Sources Folder to review the files that have been created. Creating a source records the device definition; it does not silently start or test the camera stream.
Live Sources controls
- Refresh Devices rechecks the video and audio devices currently available to Windows.
- Video source selects the camera, capture device or screen source and its available format. If a camera is unreliable, start with a 720p or 1080p format at about 30 FPS.
- Audio source selects system audio, a microphone or another available input. Choose the microphone for camera speech; choose system audio for PC-screen content.
- Video source frame rate and resolution report the format selected above.
- 3D conversion sample frame rate controls how often the live video is sampled. Start with the reported source rate and reduce it if the PC cannot maintain real-time conversion.
- Audio delay stores a synchronisation adjustment for the source. Start at 0 ms unless testing shows a consistent timing difference.
- Live Source name is the friendly file name shown in the Live Sources folder. Stream to 3D adds the file extension automatically.
Built-in camera not listed
Some laptops do not expose the built-in camera until it is enabled using the device's camera controls.
- Use the laptop camera hotkey or Fn toggle.
- Check the OEM privacy utility and BIOS/UEFI camera setting.
- In Windows, enable Camera access and Let desktop apps access your camera.
- Open the Windows Camera app and confirm that live video works, then close it so it does not keep the camera busy.
- Return to Stream to 3D and click Refresh Devices.
If the camera is still not listed, check any physical or electronic privacy shutter and install the current camera driver supplied by the PC manufacturer.
Camera or capture device: end-to-end
- Enable the camera or connect the capture device. Test a camera in Windows Camera, then close Windows Camera so it releases the device.
- Use the automatically created
Main Camera.s3dsc, or open Settings > Live Capture to choose a specific video format and audio input and create a named Live Source. - Choose Play for immediate PC viewing, Stream for a compatible network player, or Convert to record a 3D file.
- In the source browser, select Live Sources, select the camera or capture-device source, and choose Select.
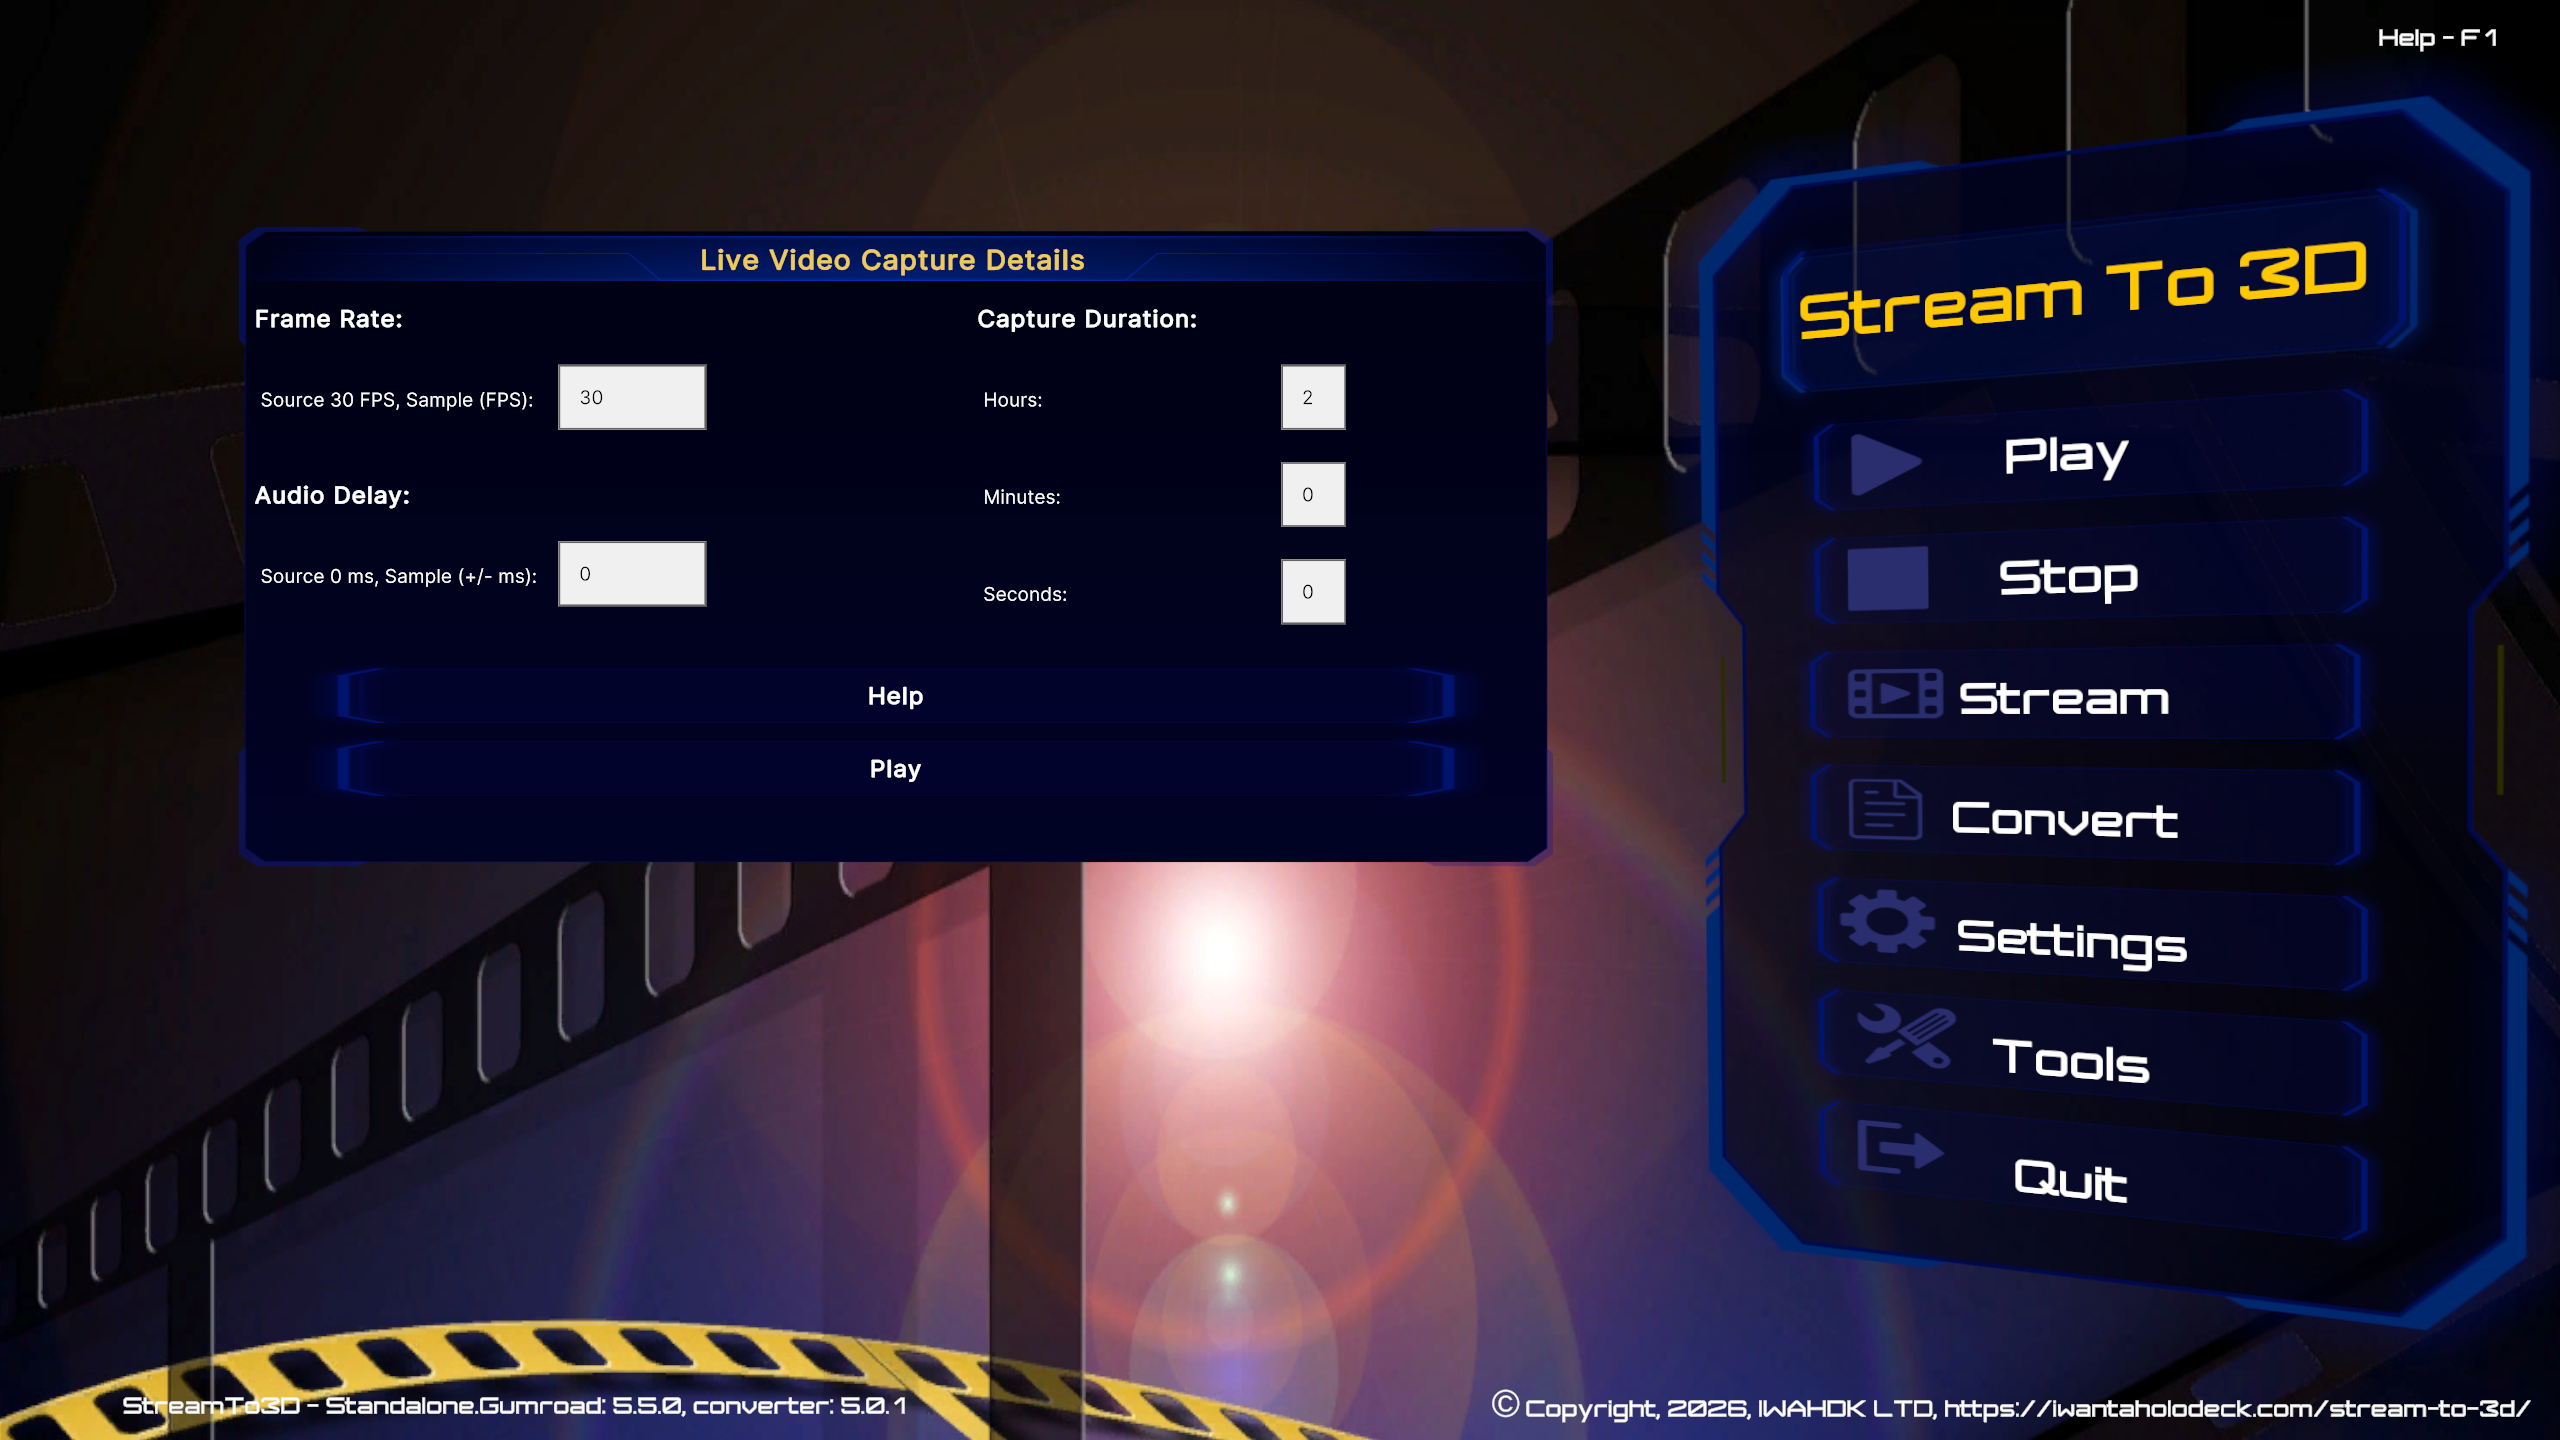
- Review Live Capture Details. Keep the source sample rate and audio delay unless testing shows that they need adjustment, and set a suitable maximum duration.
- Continue through the selected workflow. Camera and capture-device sources do not show the screen-specific display and region dialog.
If the source opens but produces no image, close other applications using the device, recheck Windows camera privacy access, and create another source using a lower-resolution or lower-frame-rate format.
Use a Live Source
Choose the live-source file from the Live Sources shortcut in the Play, Stream or Convert source browser. Stream to 3D then uses the normal workflow with additional live-capture controls:
- Capture duration limits an unattended session; you can stop earlier.
- Sample FPS controls the rate used for 3D conversion.
- Audio delay corrects audio/video synchronisation when a source needs it.
For a screen source, Stream to 3D also opens Screen Capture Settings so you can select the display or screen region, capture frame rate, audio behavior and whether Stream to 3D should minimise before capture.
Browser video and games
To view browser video through Virtual Desktop, Bigscreen or a comparable desktop route, use Screen Capture.s3dsc with Play. Put the browser on the captured Windows display and the converted output on the other extended display. The Stream button is for sending converted video over a network to a compatible media player; it is not required for this desktop-viewing workflow.
The same Screen Capture and Play route can be tried with a game or other interactive application. Live conversion and desktop/headset presentation add delay, so suitability depends on the game and the complete display path. Prove ordinary browser video first, then test the specific game before relying on it for latency-sensitive play. Some protected browser or application content cannot be captured because Windows or the source application blocks it.
Virtual Desktop with two Windows displays
For live PC-screen viewing through Virtual Desktop, use Play and keep the 2D source and converted 3D output on different Windows displays. Windows must be configured to extend the desktop across them, not duplicate or mirror the same desktop.
- Confirm that Windows Display settings show two separately numbered displays.
- Put the browser or 2D media player on the source display.
- Put Stream to 3D and its converted playback window on the output display.
- In Screen Capture Settings, select the source display, not the output display.
- In Virtual Desktop, view the output display and select the 3D mode that matches the Stream to 3D output layout.
The second Windows display can be a real monitor or a Windows-visible HDMI/DisplayPort dummy display adapter. A virtual monitor can also work when both displays appear separately in Windows, but simply seeing two panels inside the headset is not enough: the captured source and converted output must be on different Windows displays.
See the Virtual Desktop dual-display walkthrough and Quest-recorded demonstration for a concrete setup using a 1080p source display and a dummy display adapter.
End-to-end PC screen capture example
This example uses Play to convert the selected Windows display and view it in 3D while it is captured. The same Live Source selection and capture dialogs are used when the available Stream or Convert workflow is selected.
1. Choose Screen Capture
Choose Play, select the Live Sources shortcut and, if prompted, select Create to create the missing defaults. Select Screen Capture.s3dsc and then select Select.
2. Confirm the live capture details
Review the source and sample frame rates, adjust audio delay only when synchronisation correction is needed, and set a maximum capture duration. The session can still be stopped manually before that duration expires.
See Live Capture Details for the complete timing guidance.
3. Choose the screen region and audio
Select the Windows display to capture. Keep the full display dimensions or enter a smaller region, set the maximum capture frame rate, choose whether to capture system audio, and select Minimize Prior to Capture when Stream to 3D should not appear in its own capture.
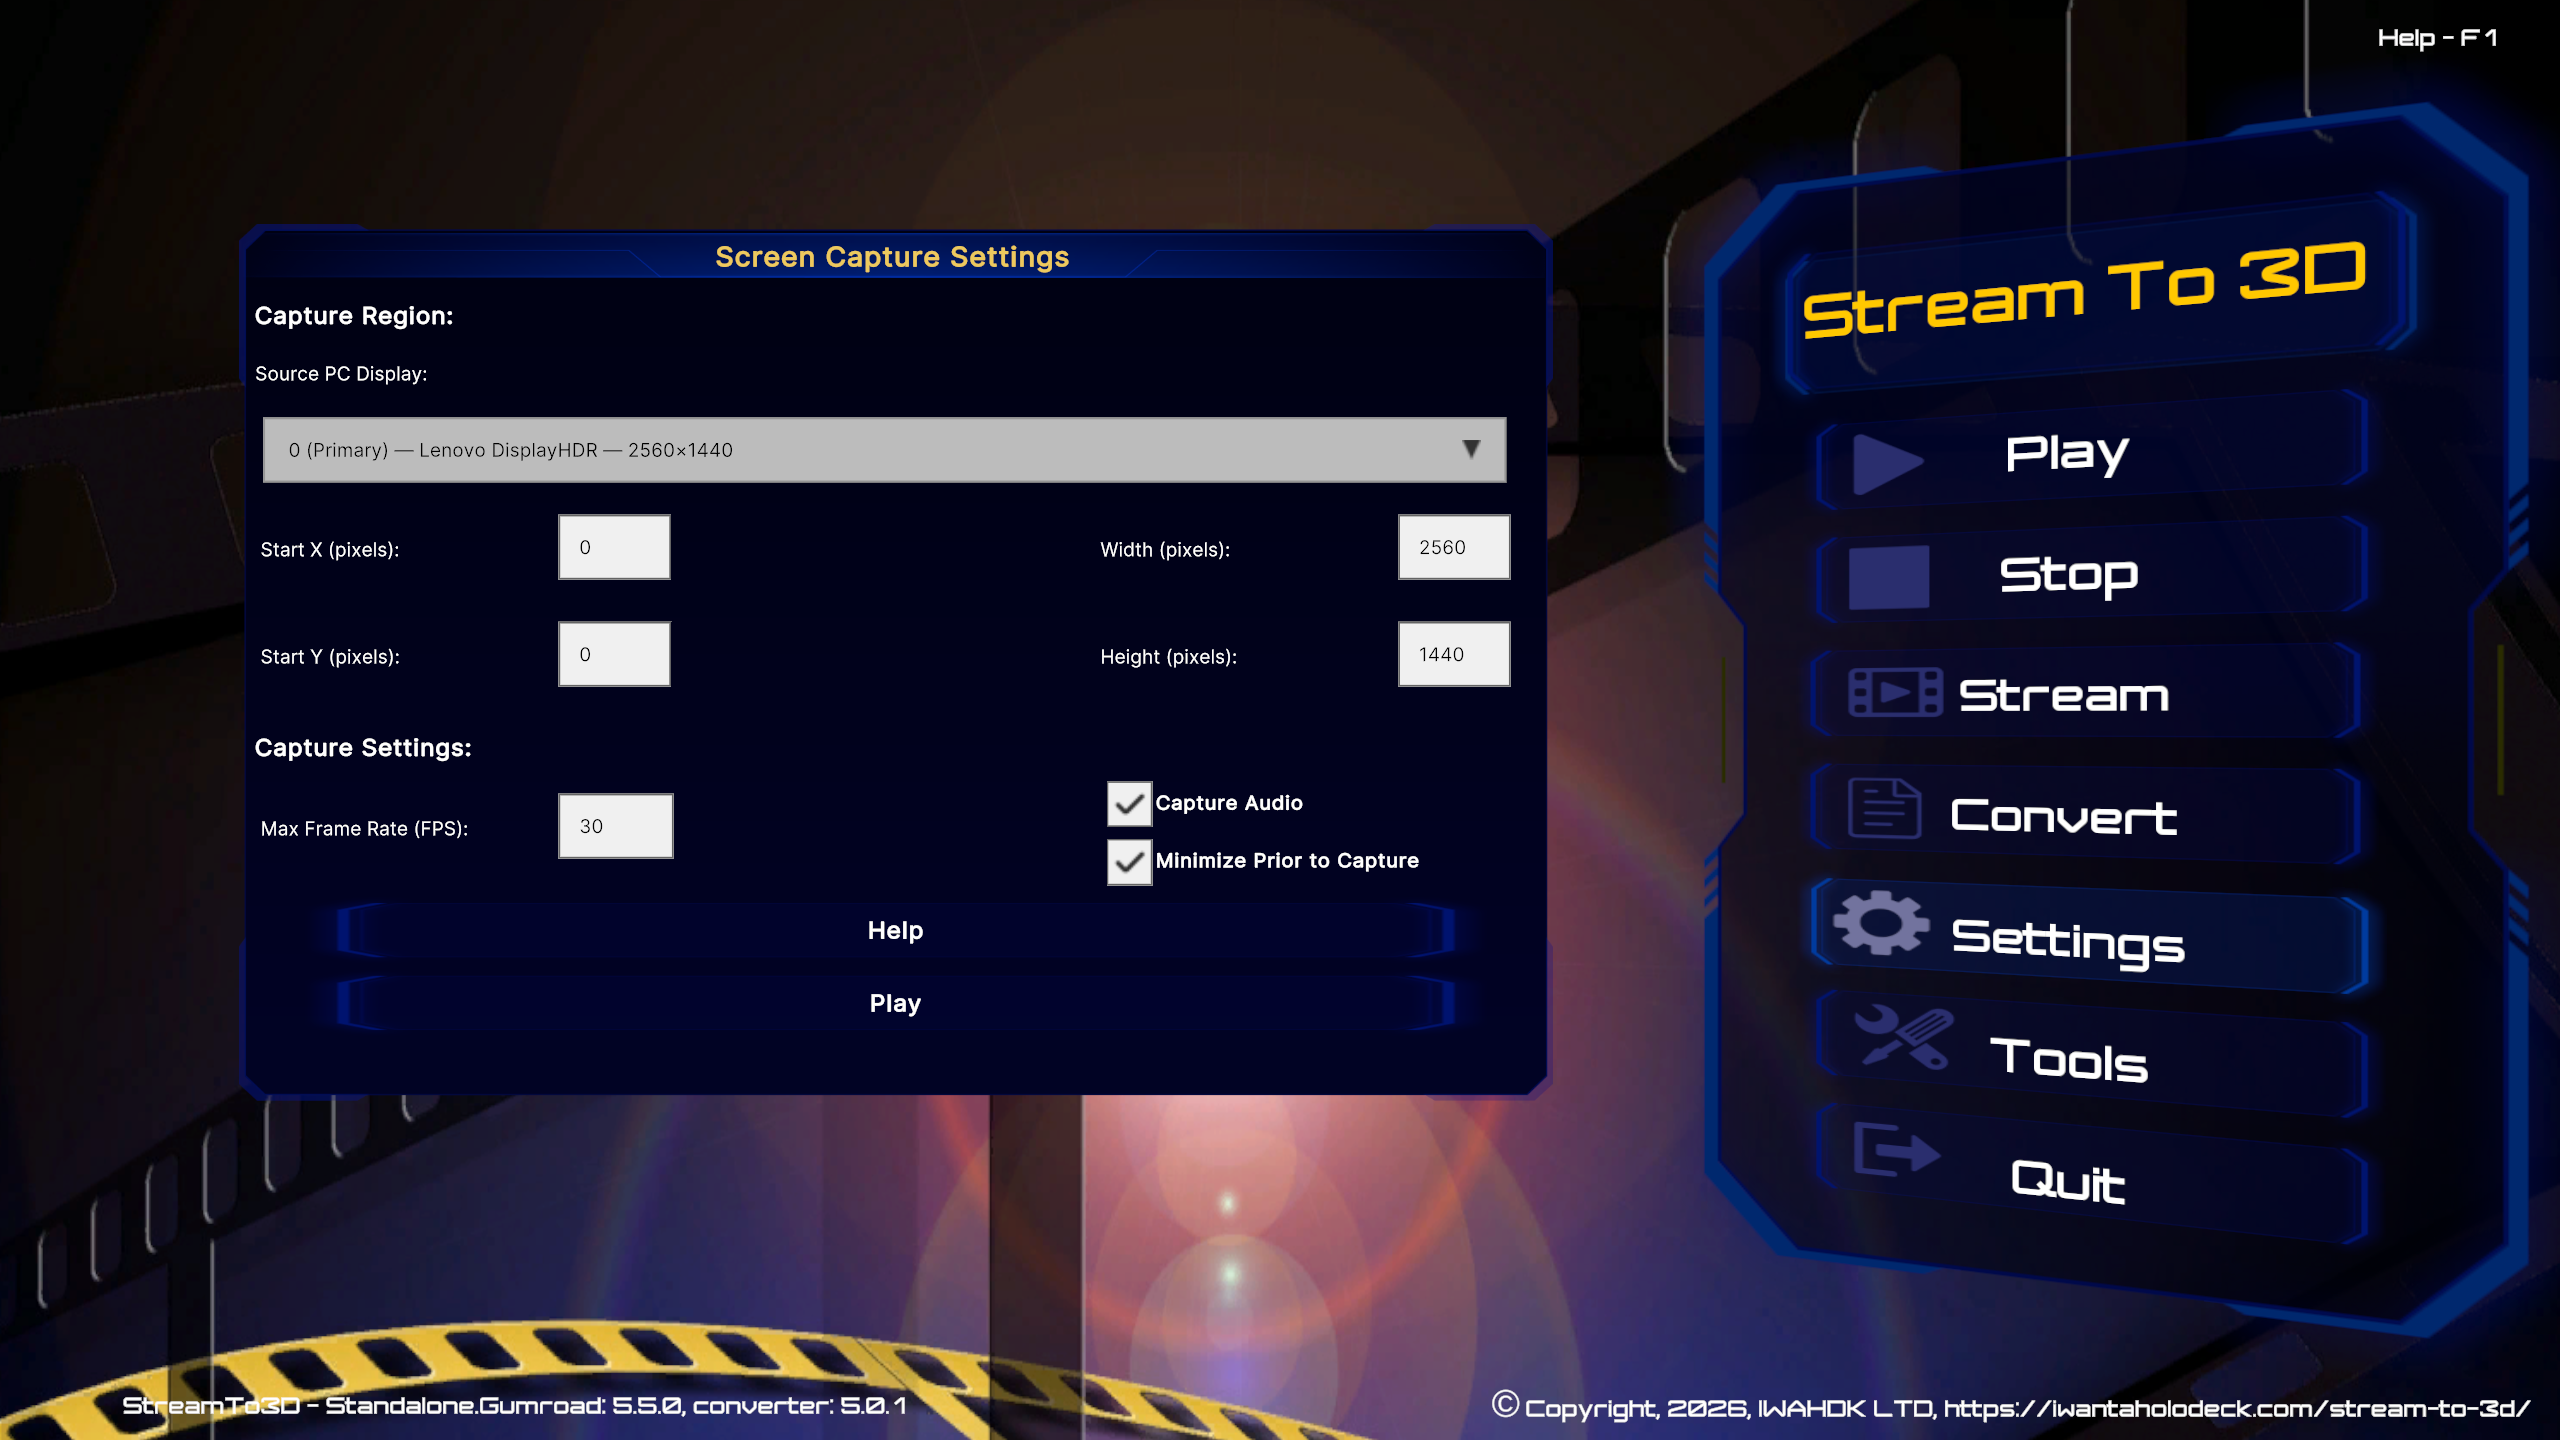
See Screen Capture Settings for display, region and single-display guidance.
4. Finish the selected workflow
If the Configuration Wizard is enabled, complete the normal Wizard choices for the intended 3D output. The Wizard configures the output settings; it does not change the selected screen source. Continue through the remaining Play, Stream or Convert settings and start the selected workflow.
Screen Capture.s3dsc. Live Capture Details is still shown, but the screen-specific display and region dialog is skipped.PC screen capture result
This demonstration shows PC screen content being converted and viewed in 3D through Virtual Desktop on a Quest headset. The video is an outcome demonstration; your exact displays, player and capture settings may differ.
The demonstration is live screen conversion: the selected .s3dsc file describes the screen source and is not a previously recorded video. Changing the content on the captured display changes the converted output while the session is running.
For the complete two-display arrangement, including the video recorded from inside a Quest headset, use the Virtual Desktop dual-display walkthrough. On a single-display setup, minimise Stream to 3D before capture or use Convert to create a file for later viewing. See Screen Capture Settings for display and region controls.
Two-stage capture and conversion
If your edition includes Convert and your PC cannot reliably capture a Live Source and create 3D output at the same time, you can split the work into two stages:
- In Settings > Wizard, select Do not apply Wizard, just use current settings.
- In Settings > Format, select No 3D Conversion.
- Choose Convert, select the Live Source, and record it as a 2D file.
- Restore the required 3D output format or enable the Wizard, then use Convert on the recorded file.
This takes longer overall, but avoids asking the PC to capture, create the 3D views and produce the final file concurrently.
Audio selection and echo
Screen capture normally captures audio playing on the PC. Camera workflows can instead use a microphone or another selected audio input. If you hear both the original 2D source and the converted output, follow the Virtual Desktop audio-echo guidance.
Troubleshooting
- If Screen Capture is missing, verify the installed capture support in Tools and Dependencies.
- If neither default can be created, confirm that Windows exposes at least one usable audio input, then select Live Sources again.
- If a camera is listed but fails when used, close other camera applications, check Windows desktop-app camera access and test a lower resolution/frame-rate format.
- If Screen Capture was created while the camera was disabled, turn the camera on, confirm it works in Windows Camera, close Windows Camera, then select Live Sources again to create the missing Main Camera source. Use Settings > Live Capture when you need a specific camera format or a custom source.
- If screen playback shows an infinite mirror, capture one Windows display and show the converted playback on the other.
- If live playback stutters, drops frames or appears to run too quickly, start with a 1080p source display and a moderate capture frame rate before increasing either setting.
- If the two views do not combine correctly in the headset, select the same SBS or TB layout in Virtual Desktop or Bigscreen that Stream to 3D is producing. Black borders can make automatic split detection less reliable.
- Some protected content cannot be captured because Windows or the source application blocks screen capture.
- If Live Sources is locked, check Licensing and Activation or contact support about the feature upgrade for an earlier Standalone licence.
- For an error code or repeatable failure, gather the information in Logs and Diagnostics.