
Play 2D Video in 3D
Use Play to convert an ordinary 2D video while watching it through a compatible Windows media player. The stereoscopic desktop output can then be shown through a desktop-to-XR route such as Virtual Desktop or Bigscreen, or on a compatible 3D display or projector.
Temporal or Depth Guided in Play
Play has to produce every output frame while the video is running. Choose Compare and recommend when you want the Wizard to evaluate a quality-ranked set of compatible Temporal and Depth Guided choices against the selected video and current PC. It stops after finding a useful recommendation and shows the nearest measured alternative. Choose Temporal or Depth Guided directly when you want to skip proving and use that method.
The result is source-specific. A choice that works for one video, output layout or power state may need to be checked again after those conditions change. Connect a laptop to mains power before the check. See Choosing Temporal or Depth Guided conversion.
Quick start with a video file
- Choose a short, familiar 2D video file without black borders for the first test. Use an ordinary file before testing a Live Source.
- Click Play and select the video. Stream to 3D opens the supported media player selected in Tools in full-screen automatically.
- If the Configuration Wizard is enabled, choose the intended device or display route. Select Compare and recommend for a short real-time assessment, or select Temporal or Depth Guided to apply that method directly.
- Start with a Half Side-by-Side output unless the target player or display requires another layout.
- In the viewing application or display, select the same Side-by-Side or Top-and-Bottom layout that Stream to 3D is producing.
- Confirm that the two views combine correctly before increasing depth, resolution or other quality settings.
If the views do not align: select the matching layout manually in the viewer and return its aspect ratio to default or best fit. For source video with black borders at the top and bottom, try a supported SBS layout. For borders at the left and right, including padded 4:3 video, try a supported TB/OU layout. Establish a clean stereo image before changing depth settings. See “It looks wrong” troubleshooting.
Need help? Start with User FAQ & Troubleshooting. See Logs & Diagnostics, Error Codes (LVE0xx), and Licensing & Activation.
Quick troubleshooting: see Tools & Dependencies checklist, “It looks wrong”, and Performance primer.
This mode is accessed via the "Play" menu button. It converts 2D video to 3D in real-time and displays it on the PC desktop in Side-by-Side or Top-Bottom 3D format. It supports MPC-HC, PotPlayer, and VLC media players. The 3D desktop view can then be viewed through a compatible VR/XR desktop route or displayed on a compatible 3D TV or projector.
Stream to 3D is not itself a VR app. Virtual Desktop, Bigscreen and comparable desktop-viewing capabilities can show the converted Windows desktop in a headset when they support the selected SBS or TB layout. Use the Configuration Wizard to select the target device and apply its nominal per-eye resolution; the Wizard does not connect or configure the headset or viewing application.
For a direct real-time stream, the headset needs a compatible media player and connection. The Convert function is device-independent: a converted file can be used with any device that has a compatible 3D media player for the file and layout.
This mode also supports 3D TVs and projectors via HDMI by outputting the 3D desktop view. The display devices can interpret the PC's HDMI input as SBS or TB 3D.
Release 6.1 optional NVIDIA acceleration
On a compatible PC, optional NVIDIA acceleration can improve Depth Guided Play performance after setup. The Wizard still measures the selected source and complete playback path; installation alone does not guarantee real-time playback. The standard compatible Depth Guided path remains available when optional setup is declined or unavailable. See the NVIDIA acceleration guide.
Playing a 2D Video in 3D
The Stream to 3D application itself starts in full-screen mode to make it easy to use from within a VR headset. Press Alt+Enter to switch the application between full-screen and windowed modes. This is separate from the media-player window that Play opens automatically.
To play a video and have it converted to 3D as you watch it, choose Play and select the file. With the Wizard On, choose Compare and recommend, Use Temporal, or Use Depth Guided. Auto reuses the saved Play policy: Compare runs the performance comparison, while a saved direct method skips proving. Off uses the current manual settings from Settings directly without proving.
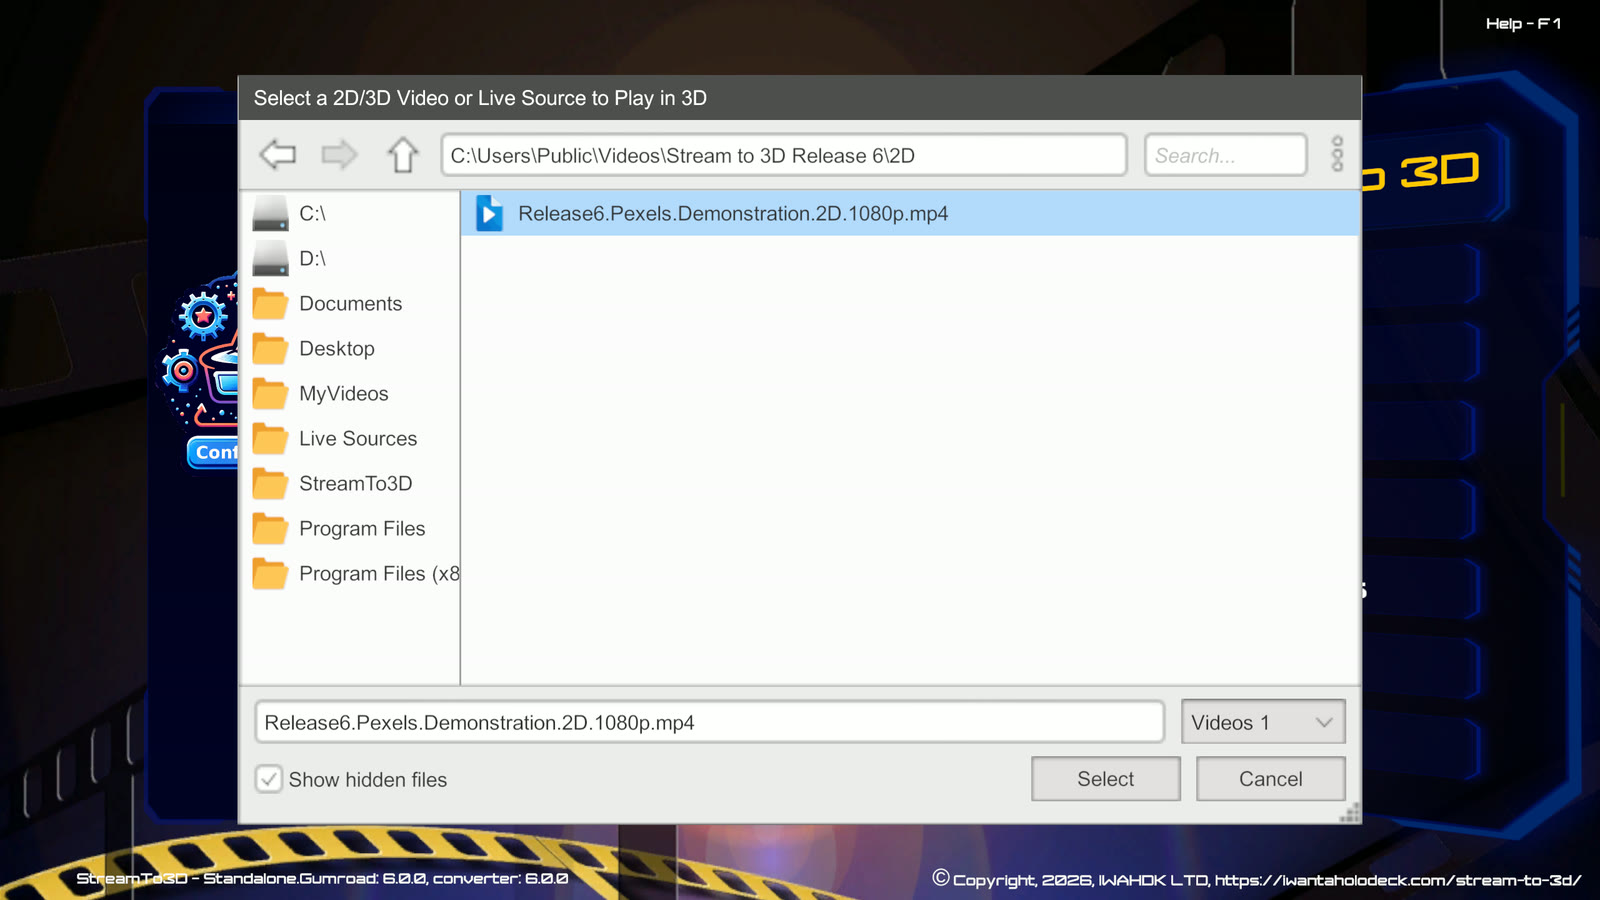
The current player is shown in the Output summary. The full guided sequence is documented in Real-time Playback via Configuration Wizard.
The video below provides a comprehensive demonstration and tutorial on Stream to 3D's real-time 2D to 3D conversion capabilities during video playback:
The guidance below provides further detail on additional tool configuration to get the most out of your Stream to 3D experience, together with Virtual Desktop and BigScreen video demonstrations.
Player and format setup
Stream to 3D can also play videos that are already in 3D, including files previously converted by Stream to 3D and compatible files from other sources. It recognises common 3D file-name markers such as "3D", ".SBS.", ".TB.", ".HSBS.", ".HTB." and ".3DA." and bypasses conversion for matching files. You can change this matching rule under Settings > Format. See File Name Pattern for 3D Videos.
MPC-HC is the default media player supplied through the K-Lite Mega Codec Pack. Steam users can install the optional PotPlayer and VLC integrations by running StreamTo3DToolsOptionalSetup.cmd from the Stream to 3D application folder, normally C:\Program Files (x86)\Steam\steamapps\common\Stream to 3D.
When you select Play, Stream to 3D starts MPC-HC in full-screen automatically and places the player on the display where Stream to 3D is running. You do not need to enable MPC-HC's Launch files in fullscreen setting. Press F11 or Alt+Enter to leave or return to full-screen while the player is open.
Stream to 3D also requests full-screen automatically when a supported PotPlayer or VLC installation is selected under Tools. Press Enter to toggle full-screen in PotPlayer or F in VLC. A custom player that Stream to 3D does not recognise may require its own full-screen setting or command-line option.
Optional MPC-HC resume settings
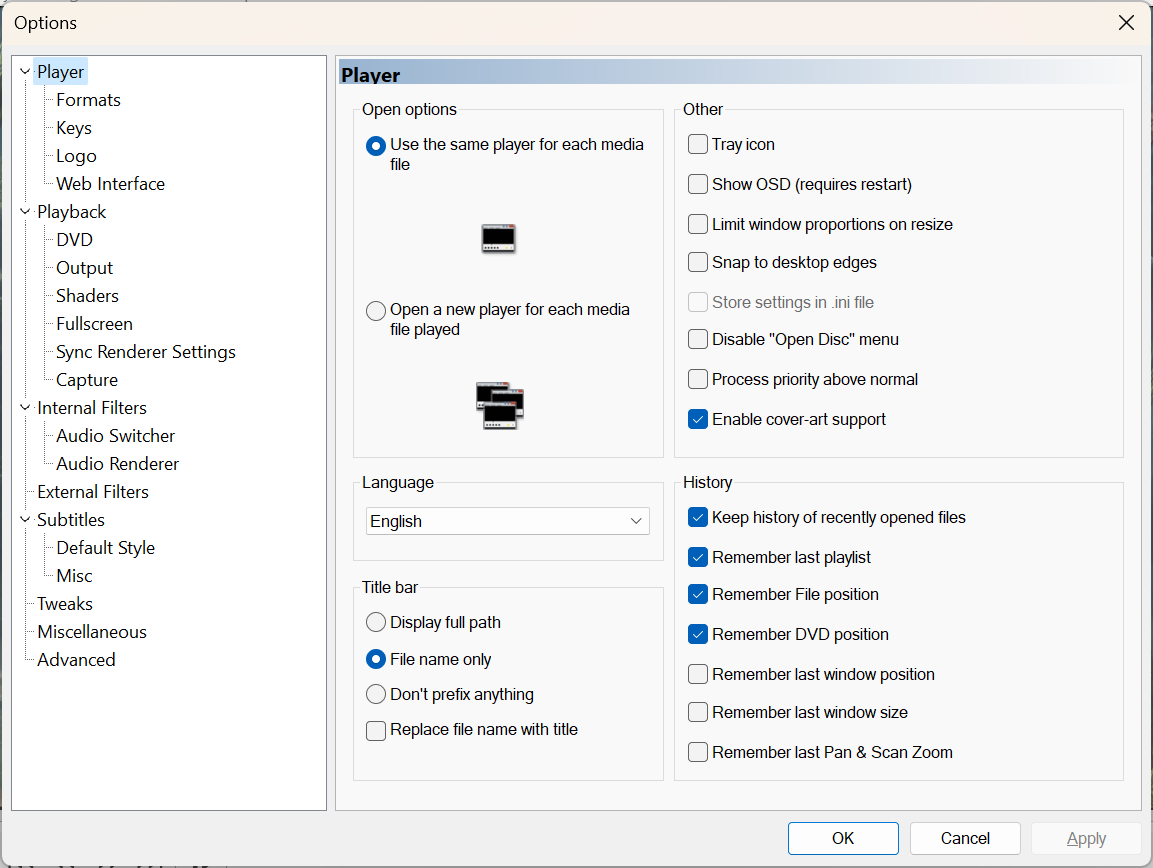
To resume a video from its last played position, enable View > Options > Player > Remember File Position:
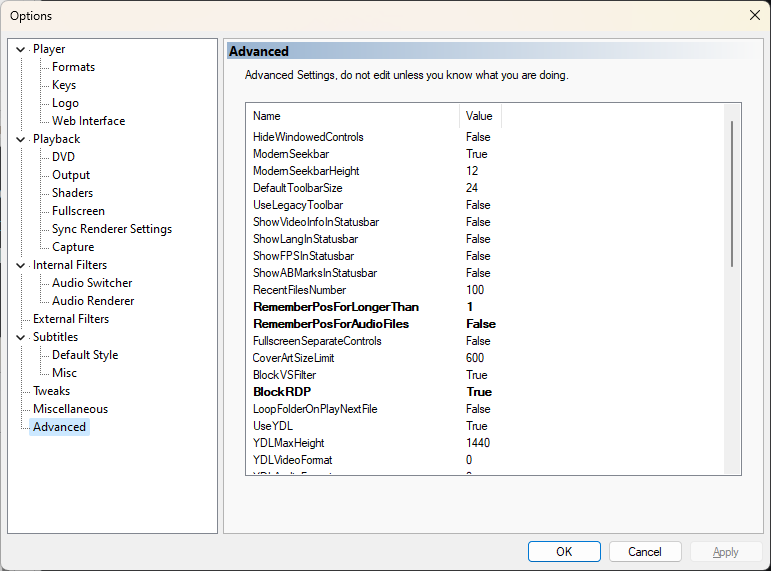
MPC-HC does not remember the position of videos shorter than ten minutes by default. To include short videos, change View > Options > Advanced > RememberPosForLongerThan from 10 to 1:
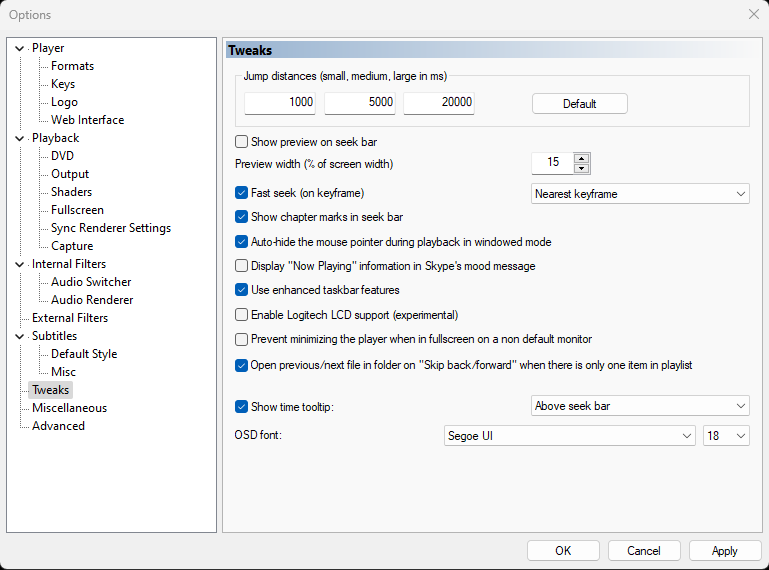
If seek-bar preview thumbnails are enabled in an existing MPC-HC installation, disable them under View > Options > Tweaks. Generating preview thumbnails while Stream to 3D is playing a video can reduce performance:
See the optional PotPlayer playback and resume settings or VLC playback and resume settings. VLC also requires its Stream to 3D playback integration to be configured before it can be selected for Play.
You can pause, seek and stop with the controls in the media player. Play converts the selected source as it is watched, so it does not need to create a complete 3D file before playback begins. The Stop button in Stream to 3D also closes the media-player process.
At this point Stream to 3D is producing a 3D layout on the PC display. To see the depth in a headset, use a desktop-viewing route that can display the Windows desktop and interpret the same SBS or TB layout. Virtual Desktop and Bigscreen are two examples.
If the headset instead has a compatible media player that can receive a direct stream, use Streaming. To watch later or transfer the result to another device, use Conversion; the converted file is not tied to the device selected in the Wizard.
Using the Configuration Wizard
The Configuration Wizard supersedes the old Virtual Desktop and Bigscreen Stream to 3D configuration files. Select your target display or headset in the Wizard to apply its nominal per-eye resolution, then choose an output layout supported by the viewing application.
Virtual Desktop can use full or half SBS layouts as well as half TB. Bigscreen uses half SBS or half OU/TB. These are settings in the viewing application; selecting a device in Stream to 3D does not configure that application for you.
You can still adjust Stream to 3D settings manually and save your own configuration files, but the retired viewer-specific files should not be used for Release 6 setup.
Watching a 2D Video in 3D with Virtual Desktop
The full installation and setup of Virtual Desktop is outside the scope of this guide. However, the essential steps are given below:
- Install the Virtual Desktop streamer application on your PC.
- Install the Virtual Desktop application in your VR Headset.
- View your PC's Desktop within your headset via Virtual Desktop.
- Play video on PC Desktop via Stream to 3D.
- Use Virtual Desktop's view options to switch to a 3D SBS or TB video view and watch the video in 3D in your headset.
You can find installation details and the Virtual Desktop streamer application here.
The video below provides an example of using Virtual Desktop with Stream to 3D to play a 2D video in 3D in an Oculus Quest 2 headset. The system details used for this demonstration are the same as those described for proving here.
The laptop PC employed is running a 4K desktop view. The Oculus Quest 2 headset is connecting wirelessly, with the headset in a different physical room to the laptop, but in the same room as one of the DECO X20 AX1800 mesh WIFI nodes used in this system setup.
The 2D trailer used in the demonstration is 1080p resolution. The video uses the Virtual Desktop Home Cinema environment.
The video also shows switching between Full SBS and Half SBS formats:
The video ends with the launch of a SteamVR environment using the SteamVR menu option in Virtual Desktop. This environment is then used to launch Bigscreen on SteamVR in the next demonstration video:
Watching a 2D Video in 3D with Bigscreen on SteamVR
This demonstration uses the Windows PCVR version of Bigscreen Beta from Steam. Bigscreen and Stream to 3D both run on the Windows PC, while SteamVR supplies the headset route.
- Install Bigscreen Beta from Steam on the Windows PC.
- Connect the headset through its appropriate SteamVR or PCVR route.
- Launch Bigscreen Beta through SteamVR and display the Windows desktop.
- Use Stream to 3D Play to show the converted video on that desktop.
- Select the Bigscreen SBS or OU/TB view that matches the Stream to 3D output.
Bigscreen Remote Desktop is not required for this SteamVR PCVR route. It is a separate Windows companion for the standalone Meta Quest route, where the Bigscreen app runs on the headset.
Bigscreen's desktop 3D modes use Half SBS and Half OU/TB for this workflow, not Full SBS. Select the matching mode in Bigscreen; the established demonstration below uses Half SBS.
The video shows real-time 2D-to-3D conversion in Bigscreen's Sci-Fi cinema. It begins with the move from the Bigscreen Home environment into the cinema before playback starts. The Quest 2 PCVR route shown in this 2023 recording was revalidated with Quest 3 and Virtual Desktop in October 2026.
Before playing, use the Stream to 3D Configuration Wizard for your target device and select the intended half SBS or half TB output layout.
The Bigscreen keyboard is accessible through the Tools & Toys menu. Its Windows Key + Tab button is particularly useful for switching between the media player and Stream to 3D.
Enable the stereoscopic desktop through Bigscreen's Desktop/3D Setting, choosing SBS or OU to match the Stream to 3D output. Return Bigscreen to 2D before using Windows Key + Tab so ordinary desktop applications remain easy to read. For current setup and troubleshooting, use the dedicated Bigscreen guide:
Play a Live Source
Playing an existing 2D video file is the normal starting point described above. Live Sources are an additional Play option for viewing a PC screen, camera or capture device immediately on the Windows desktop. This Play workflow is available in the Real-Time edition when Live Sources are enabled.
Use it when Virtual Desktop, Bigscreen or another desktop-viewing application is showing the converted display in a headset.
- Choose Play and select the Live Sources shortcut in the source browser.
- Create the default sources if prompted, then select
Screen Capture.s3dsc,Main Camera.s3dscor another saved source. - Confirm Live Capture Details. Screen Capture also asks which display or region to capture.
See Live Sources quick start for the complete screen and camera workflow. Do not choose Stream merely because the source is live; Stream is for sending output to a compatible network player.
Return to Stream to 3D Documentation.